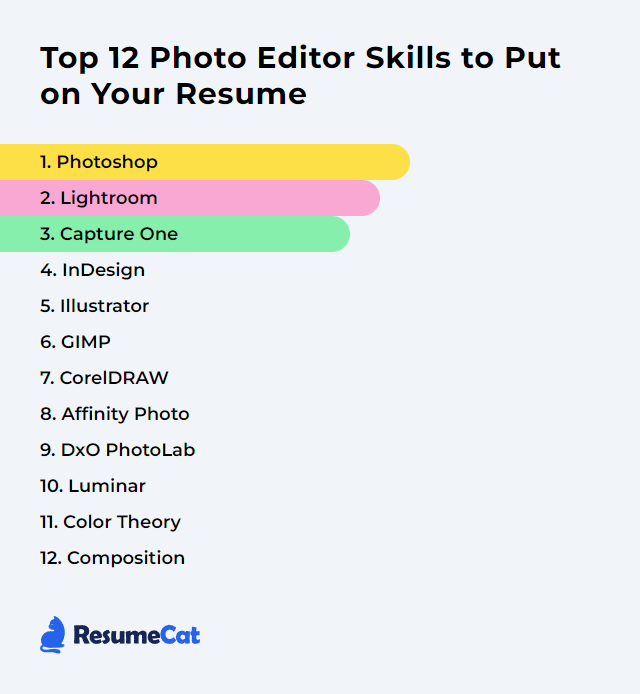
Top 12 Photo Editor Skills to Put on Your Resume
In a visual world that never sits still, sharp photo editing chops turn good images into unforgettable ones. Listing focused photo editor skills on your resume signals you can shape stories, work fast, and keep up with new tools without breaking stride.
Photo Editor Skills
- Photoshop
- Lightroom
- Capture One
- InDesign
- Illustrator
- GIMP
- CorelDRAW
- Affinity Photo
- DxO PhotoLab
- Luminar
- Color Theory
- Composition
1. Photoshop
Photoshop is Adobe’s flagship image editor for retouching, compositing, and design—pixel-level control with an ocean of tools.
Why It's Important
It delivers precision, creative flexibility, and pro workflows—from raw development to intricate composites—so your edits hold up under any spotlight.
How to Improve Photoshop Skills
Get faster, cleaner, braver with your edits.
Nail non-destructive basics: adjustment layers, masks, Smart Objects, layer comps. Keep options open.
Speed is everything: learn shortcuts, Actions, and batch operations. Save the fiddly stuff for when it counts.
Selections that stick: refine edge, channels, subject/sky selections, and object selection. Precision pays.
Retouch like a surgeon: frequency separation, dodge and burn on 50% gray layers, healing vs. clone—know when to use which.
Color confidence: curves, selective color, LUTs, blend-if, and layer blend modes for subtle tonal control.
RAW to wow: Camera Raw for global tone, color, and Denoise before fine work in layers.
Modern features: content-aware fill, remove tool, and newer generative features to speed cleanup and ideation.
Consistency: color profiles, soft-proofing, and exports engineered for web or print.
Steady practice with real projects will harden these into muscle memory.
How to Display Photoshop Skills on Your Resume

2. Lightroom
Lightroom streamlines ingest, culling, global edits, and export—catalog or cloud-based—so large shoots stay organized and sharp.
Why It's Important
It’s built for speed and consistency. Batch edits, profiles, masks, and rock-solid metadata keep your workflow humming.
How to Improve Lightroom Skills
Library discipline: collections, keywords, ratings, and filters that actually match how you shoot. Build a system you’ll keep.
Profiles and presets: apply deliberate starting points, then refine. Sync across sets for uniformity.
Masking magic: subject/sky/object masks, luminance and color range. Target what matters without round-tripping.
Detail first: lens corrections, transform, noise reduction, sharpening, and Denoise AI before creative color.
Speed edit: Auto Sync, Copy/Paste, Previous, and survey/compare views for ruthless culling.
Smart Previews: edit anywhere, even if originals live on a separate drive. Faster on big catalogs too.
Performance: GPU acceleration, standard previews, and periodic catalog optimization. Keep it snappy.
Small time savers compound across thousands of frames.
How to Display Lightroom Skills on Your Resume
3. Capture One
Capture One is a pro-grade editor known for tethering, nuanced color control, and superb raw rendering.
Why It's Important
In studio or on set, it offers resilient tether workflows and deep color tools that many fashion and product teams swear by.
How to Improve Capture One Skills
Catalogs vs. Sessions: pick the structure that fits your shoots and stick to it.
Tether like a pro: presets, overlays, live view, and auto-naming; build styles you can apply as images land.
Layers everywhere: local edits with opacity and masks for precise control without round-trips.
Color mastery: Basic and Advanced Color Editor, Color Balance wheels, skin tone uniformity—dial in the look.
Variants and styles: compare creative directions without duplicating files; standardize across sets.
Speed Edit: keep hands on the keyboard for fast global adjustments.
Refine a repeatable tether-to-export pipeline and your sessions will fly.
How to Display Capture One Skills on Your Resume
4. InDesign
InDesign is a layout and typesetting workhorse. Not a photo editor, but indispensable for magazines, books, brochures, and digital spreads.
Why It's Important
It fuses images and typography with exacting control—bleeds, grids, styles—so visual stories land clean and consistent.
How to Improve InDesign Skills
Place, don’t paste: link high-res images, manage them in the Links panel, and update non-destructively.
Styles stack: paragraph, character, object, and nested styles to keep multi-page projects uniform.
Text + images: text wrap, anchored objects, and baseline grids for tidy, readable layouts.
Color management: consistent profiles, overprint preview, and preflight checks to avoid print surprises.
Export with intent: PDF presets for print vs. interactive, proper bleeds and marks, and image downsampling where needed.
The handoff matters as much as the edit—finish strong.
How to Display InDesign Skills on Your Resume
5. Illustrator
Illustrator creates vector graphics—logos, icons, type-driven art—scalable without quality loss.
Why It's Important
For photo-led projects, vector elements add clarity and polish: crisp overlays, custom shapes, brand assets that stay sharp everywhere.
How to Improve Illustrator Skills
Pen, anchors, paths: precision curves and clean shapes are the foundation. Practice tracing and simplifying.
Shape Builder and Pathfinder: combine, subtract, intersect. Build complex forms fast.
Type finesse: variable fonts, optical kerning, and outlining paths when needed for print control.
Masks and appearances: opacity masks and the Appearance panel for layered, non-destructive effects.
Image Trace wisely: convert bitmaps when needed, but refine paths; avoid bloated results.
Photoshop handoff: export SVG/PNG with transparency or paste as Smart Objects for hybrid workflows.
Clean vectors elevate the whole frame.
How to Display Illustrator Skills on Your Resume
6. GIMP
GIMP is a free, open-source image editor for retouching, compositing, and format conversion.
Why It's Important
It’s accessible, powerful, and extensible—great for budgets, experiments, and custom workflows.
How to Improve GIMP Skills
Workflow basics: layers, layer masks, blend modes, and adjustment tools. Keep edits reversible.
RAW pipeline: process raws via Darktable or RawTherapee and pass 16-bit images into GIMP for finishing.
Selections and paths: quick mask, feathering, and the Paths tool for accurate cutouts.
Retouch toolkit: heal, clone, warp transform, wavelet decomposition for skin work.
Extend it: explore GEGL-based filters and popular plug-ins like G’MIC for advanced effects.
Performance: tune tile cache, enable multi-threading, and work in higher bit depth when possible.
With the right add-ons and habits, GIMP punches above its weight.
How to Display GIMP Skills on Your Resume

7. CorelDRAW
CorelDRAW focuses on vector illustration and layout; it pairs well with Corel PHOTO-PAINT for raster editing.
Why It's Important
For photo-centric design—posters, covers, merch—it blends vectors, type, and images into cohesive compositions.
How to Improve CorelDRAW Skills
Vector precision: Bezier tools, node editing, and smoothing for clean, efficient paths.
PowerTRACE: convert bitmaps to vectors sensibly—simplify nodes, tidy shapes.
Non-destructive effects: use lenses and effect stacks so experiments stay editable.
Color management: set document/monitor/printer profiles and soft-proof before export.
Layout control: master pages, grids, and styles for multi-page consistency.
Round-trip: switch to PHOTO-PAINT for raster tweaks, then update links back in CorelDRAW.
A tight vector-raster handshake makes complex pieces manageable.
How to Display CorelDRAW Skills on Your Resume
8. Affinity Photo
Affinity Photo is a one-time-purchase editor with pro-grade layers, masks, live filters, and robust RAW tools.
Why It's Important
It delivers high-end results without subscriptions, with fast performance and broad format support.
How to Improve Affinity Photo Skills
Personas: Develop for RAW, Photo for layers, Liquify for sculpting, Tone Mapping for HDR. Work where the task fits.
Live Filters: stack them non-destructively, reorder, mask, and tweak on the fly.
Selections + refine: selection brush, refine edges, and channels for hair, fur, and tricky transitions.
Macros and batch: automate repetitive steps and process whole folders while you move on.
Color and soft-proofing: set profiles and check output intent before export.
Advanced merges: focus stacking, HDR, and panoramas for technical precision.
Lean into its speed—iterate quickly and keep versions.
How to Display Affinity Photo Skills on Your Resume

9. DxO PhotoLab
DxO PhotoLab excels at optical corrections, denoising, and crisp RAW processing.
Why It's Important
Its lens/camera profiles, DeepPRIME denoise tech, and U Point local adjustments deliver clean files with minimal fuss.
How to Improve DxO PhotoLab Skills
Start with optics: apply lens profiles, geometry corrections, and chromatic aberration fixes upfront.
DeepPRIME/DeepPRIME XD: denoise early in the pipeline for better detail retention at high ISO.
Local control: control points and control lines with chroma/luma sliders target tricky areas elegantly.
Smart Lighting and ClearView: tame contrast and haze without wrecking midtones.
Color rendering: choose camera-matching or filmic looks, then fine-tune with HSL.
Projects and presets: organize edits and standardize looks across sets for consistent delivery.
The cleaner the base file, the less heavy lifting later.
How to Display DxO PhotoLab Skills on Your Resume
10. Luminar
Luminar (including Luminar Neo) leans on AI-assisted tools for quick creative transformations.
Why It's Important
It speeds complex edits—relighting, sky swaps, portrait cleanup—so you can iterate styles rapidly.
How to Improve Luminar Skills
Work in layers: stack effects, mask selectively, and balance with opacity for believable results.
Targeted AI tools: Sky, Relight, Portrait Bokeh, Skin, and Structure—use lightly, avoid overcooking.
Custom presets: build looks tailored to your genre; apply and tweak per image.
Color grading: split toning, color harmony, and LUTs for mood that holds across a series.
Performance: enable GPU acceleration and keep assets on fast storage to reduce lag.
Let it handle the heavy lifting, then refine by hand.
How to Display Luminar Skills on Your Resume
11. Color Theory
Color theory explains how hues interact, steer emotion, and shape visual balance—your compass for mood and coherence.
Why It's Important
It guides harmony, contrast, and storytelling so color supports subject and message instead of fighting them.
How to Improve Color Theory Skills
Know the wheel: primaries, secondaries, complements, and split-complements—predict interactions before you push sliders.
Harmony with intent: analogous for calm, complementary for pop, triadic for energy. Choose deliberately.
Psychology matters: color nudges feeling—cool vs. warm, muted vs. saturated. Use it on purpose.
Grade with structure: anchor neutrals, protect skin tones, and shape luminance before saturation.
Analyze references: reverse-engineer film stills, campaigns, and editorials. Then adapt, don’t copy.
Build LUTs/looks: create portable grades you can apply across projects for continuity.
Taste grows with repetition—train your eye relentlessly.
How to Display Color Theory Skills on Your Resume
12. Composition
Composition is the arrangement of elements—subject, lines, space, light—so the frame reads clearly and feels intentional.
Why It's Important
It directs attention, clarifies story, and raises the aesthetic ceiling of every edit.
How to Improve Composition Skills
Rule of thirds and beyond: place key elements on intersections, then break rules once you feel why they work.
Leading lines: guide the eye toward the subject; straighten or reinforce them in post.
Symmetry and pattern: embrace them—or disrupt them—to create tension.
Frame within a frame: doorways, foliage, architecture. Depth pulls viewers in.
Edit for clarity: crop distractions, simplify backgrounds, and balance negative space.
Light is design: dodge and burn to sculpt attention, not just exposure.
Color as structure: use contrast and harmony to route the gaze.
Trim the noise, amplify the intent. The image breathes.
How to Display Composition Skills on Your Resume